Wednesday, April 22, 2009

Installing PostgreSQL (hard version)

Note: below description uses PostgreSQL 8.3.7 version installed on 32 bit Windows XP.

In a previous article I presented how to install PostgreSQL using Windows installer. It was quite easy. But ...
There are people that do not play with such ease, what is more, they can not stand when the system is doing something for them in the background, when something is installed - some services, user accounts... They feel insecure, they are suspicious - only the execution of all activities from the command line calms their nerves.

This time, I prepared the description for the people who love technical masturbation and who love to do everything manually and have everything under control. We'll become the PostgreSQL installer and manually execute all the installation steps to get an effect similar to using Windows Installer. So, let's get to work.

Requirements:
  • we are working on Windows XP using account with Administrator rights (or we belong to the Administrators group)
  • database will be installed to C:\Development\PostgreSQL (the same as when using Windows Installer)
  • disable all antivirus/firewall (this one from Windows too)
Step 1: download the version of the installation file (.zip) of PostgreSQL from here. Download the file with the "binaries-no-installer" part in its name.

Step 2: extract the contents of the file from step 1, to C:\Development\PostgreSQL (zip has the pgsql directory and rest of the folders inside it - I recommend to get rid of it and move all subfolders to C:\Development\PostgreSQL - we will have a shorter path). We should get something like this:


Step 3: we need to create an empty directory named "data" in the directory C:\Development\PostgreSQL (along with the rest of the directories from the picture above).

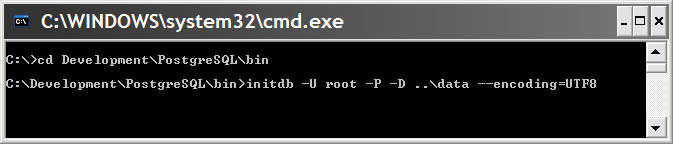
Step 4: create and initialize the database cluster (remember that we are working on the account with Administrator rights). To do this go to the console to the directory C:\Development\PostgreSQL\bin and execute the command:


Desription:
  • option "-U root" means the owner of the database named root - such user account will be created in database (as a superuser)
  • option "-W" means that You will be prompted for a password for this user
  • option "-D .. \ data" means the location of the files for generated database
  • option "- encoding = UTF8" means that the server will have UTF8 encoding by default (each newly created database too!)
After executing this command, we should see sometling like this:


At the bottom, PostgreSQL offers us to run a newly created database using two different commands. It will not work (You can execute those command to see what error is generated) - remember that we are working on account with Administrator rights, and for safety reasons, we can not start and stop the PostgreSQL server on that account. We should create a system service which will run PostgreSQL server process.

--------------------------------------------
The short version:

Step 5: Perform the following command in the console:


That's all. You're done. The service will be created and registered for the Local System Account. This is a special account which can run services, but it is not a typical account with administrator privileges (more info here).

Do not run the service yet.

--------------------------------------------
Long version:

Step 5: continue to imitate the installer. PostgreSQL installer creates a special account with no administrator privileges - so we will also create such account. Acount login and password will be both set to "postgres". We go to Computer Management, then Users:


Now we add new user with login and password postgres:


For the security reason we do not allow to change the password.

We would like now to make "postgres" account able to run the PostgreSQL server. So we need to create and register a special service for this account, which will carry out these operations. Before we do that we need to assign to this account the appropriate permissions to directories where database server is installed.

Step 6: Change the access permissions for the directory server for the postgres account.

And so:
1. Directory C:\Development should only have read permission.
2. Directory C:\Development\PostgreSQL (and its subdirectories) should have all possible permissions.

Step 7: Registering the service.

Using the console go to the directory C:\Development\PostgreSQL\bin and execute there this command:


Description:
  • option -N "PostgreSQL Service" defines the service name
  • option -U postgres says on what account the service is launched
  • option -P postgres gives the password for service account
  • option -D "C:\Development\PostgreSQL\data" tells where database cluster is located (be careful it is very important here to give the full path to the directory "data")

We do not run the service.

--------------------------------------------
Configuration:

Before starting the service must change the basic settings. Move to the directory C:\Development\PostgreSQL\database and open the file postgresql.conf. In this file, You must find and uncomment the following lines:
  • listen_addresses = 'localhost'
  • port = 5432

Now You can start a service in the panel management services.

If everything was done properly, the service should start. If we chose the longer version, in case of trouble with starting the service we should go to the configuration of a service, then select an account for this service and retype password for that service (in our case: postgres)

Theoretically we have the ability to log from the console to the database using the command line (marked red colour):


Thus we should get exactly the same result as using the Windows Installer.

Notes: a short way works ok under Windows XP Prof., should also works ok under Windows Vista - in both systems there is the Local System Account for services. For Windows 2000 You must perform the installation in a long way. For safety, PostgreSQL installer always chooses longer way - it creates an account for the service, then creates sevice itself and registers it to the created account.

Sunday, April 19, 2009

Installing PostgreSQL (soft version)

Note: below description uses PostgreSQL 8.3.7 version installed on 32 bit Windows XP.
 
Installing PostgreSQL is theoretically piece of cake, but in my opinion there are some aspects worth saying a little more.
Those who installed MySQL database using the graphic installer on Windows, know that the installation process goes something like this: "Next, next, next, yes I want to have root access from remote machines, quit." This is almost the same as installing any program on Windows. PostgreSQL installer is not much more different in this case.

So what's the point? In a slightly different philosophy of security model - different than in MySQL. Okay, enough of this pseudo-technological gibberish - let's install database.

Step 1: Download the PostgreSQL from here. Download a file named postgresql-8.3.7-1.zip.

Step 2: After unpacking the zip file, run the installer and choose English


Step 3: after the splash screen and license information installer will ask us about the target installation directory. I suggest using directory C:\Development\PostgreSQL.


Step 4: Configure account for the PostgreSQL service.

It is convenient to install PostgreSQL as a service in Windows - the database server will always run at startup. We have something new in this point: PostgreSQL requires a special account in the system that does not have administrator rights in order to start the database service and initialize the database cluster. It is important to set a well-known password for this account, because in case of problems with PostgreSQL we will be able to use this account to peform some fixes on database files.


Step 5: configure the settings of the database server, super user account (root) and access from remote machines.

This is a step similar to step in the installation of MySQL, I recommend setting the server and client encoding to UTF-8 - this is the standard that should be use instead of some bizarre national encoding. Why? Because it gives us the flexibility - perhaps we want to store in our database accented Polish and German umlauts. In addition we will avoid potential problems with conversions etc.


Step 6: Installation.

Warning: before installation make sure that You have enabled and running Windows service named "Secondary Logon". Our system account "postgres" from step 4 needs that service. When it is not enabled, the installer will report an error:


Just turn on the service and the trouble is gone. Then on next screens just click "Next" without changing anything until You get to the last screen - the final step in our installation process.

Step 7: The end of the installation.


The selected checkbox allows You to install additional software and extensions for PostgreSQL. At the moment we do not need them so we can safely uncheck it and complete the installation - voila, we have PostgresSQL :-)

Okay, once we have database installed, let's take a look inside - just to write simple SELECT and be proud of Yourself that You still remember some SQL syntax ;-) Nothing could be more simple. Along with PostgreSQL was installed pgAdminIII - an advanced graphical client. Just find it in the windows start menu and run:


When You double-click the server, You will be asked for Your root password from step 5. After typing the correct password, You will be logged to the server as root (superuser):


PostgreSQL creates a default database named "postgres". We can log in to this default database using command line. Of course, we can also delete this database. Then we have available two more so-called "service" databases that are hidden (they are not visible by default in pgAdmin tree view). The names of those databases are "template0" and "template1". PgAdmin allows us to configure the server, manage users, roles, databases, etc. For details, refer to the documentation.

Saturday, April 18, 2009

IDE (Eclipse) installation and Java configuration

Note: below description uses 32-bit Eclipse for Java EE Developers (Juno). Use latest one.

Requirements:
  • installed Java JDK, as described in this article.
There is really no big deal here. But in order to follow the rules from initial post I will describe how to "install" Eclipse and configure it to work with previously installed Java JDK.

Step 1: Download the latest Eclipse for Java EE Developers from here.

Step 2: Once we have the Eclipse, unpack the package to C:\Development\Eclipse - and that's all Eclipse is installed :-)

Now it's time for a basis configuration:

Configuration Step 1: After first startup Eclipse will ask us where we want to put the workspace directory. I suggest using this directory C:\Development\Eclipse_Workspace.


Configuration Step 2: After closing welcome screen, Eclipse will stay with default Java EE view perspective. It is OK, now it's the time to configure JDK. go to the Window -> Preferences menu and select:


Configuration Step 3: adding new standard virtual machine (JVM).


Configuration Step 4: just show the location of our previously installed JDK, and give it a name i.e. JDK_7_32bit


Configuration Step 5: switch to the installed JDK.


Configuration Step 6: Configure Eclipse startup parameters.
Search for the eclipse.ini file and at the beginning of the file add these two (yes two!) lines:

-vm
C:\Development\Java7_32bit\bin

By doing this we set the default virtual machine which Eclipse uses. Please note that this is exactly the same Java JDK which was configured in the above step 4 (here in addition we point into directory "bin").

Eclipse is installed and ready for use.

Friday, April 17, 2009

Installing Java

Note: Below description uses 32-bit Java JDK 7 update 21. Use latest one, installation procedure is similar.
 
Step 1: Download the Java JDK from here. Download exactly Java SE Development Kit (JDK), without any additives inside (bundles) - just regular JDK.

Step 2: We start the installation. After two (or maybe three) screens we come to the screen where we choose the installation location. Let's change the target directory to C:\Development\Java_7_32bit:


Step 3: Install the virtual machine (JRE) for the browser - leave the default target unchanged (C:\Program Files\...).


In case of any problems (errors about broken installer and so on), uninstall Java and try to repeat the whole procedure. I recommend to put installer file directly on C drive and start installation procedure again from there. 


Step 4: Create new system variable named JAVA_HOME and we set its value to C:\Development\Java7_32bit

Step 5: Modify existing Path system variable by adding at the end value ;%JAVA_HOME%\bin

Gather all hammers inside toolbox.


As I wrote in my first article, we will start from installing the necessary tools. What are we going to install? For today, it will be (when I get something new this post will be changed):
  • Java JDK
  • Eclipse
  • PostgreSQL database
  • Apache Tomcat
Some comments why we need those tools:

Java -  comment is probably redundant.  Use the lastest one.

Eclipse - choose whatever You want. Eclipse is free, but there are other tools available free like Idea Community or NetBeans.


PostgreSQL - why just this database ("everyone knows that MySQL is the best, fastest and for free")? It is my personal choice - I used those two databases, but it seems to me that PostgreSQL is more polished and more meets my needs. And most important: it is completely free (I am not sure if MySQL is free for every case). Okay it is clear, but why do we need a database? Just in case we would like to write some sophisticated data storing application. Database will be very useful in such case ;-).


Tomcat - do we need it? Yes we do - just in case we would like to move our super data storing application into the internet (meaning: create another online store and earn a lot of money ;-)). For the most of examples (connected with web applications) Tomcat will be sufficient.


Okay, so where should we install those tools? In order to have consistent solution I suggest put everything in one directory, and create some subdirectory structure inside.I decided to put everything inside directory named "Development" on my C drive - C:\Development. Inside that directory I will place subdirectories for the mentioned above tools.

Good advice for the future: do not use paths with whitespaces and any national characters. This will save our time for searching and fixing some X-Files category problems ;-).

The Beginning

First of all I would like to apologize for my english. I decided to write this blog in english for one simple reason - more people will find it and read it ;-)

You should already now what is the idea of this blog (if not, You can read about it on the left). I assume that You did something using Java and You have a minimum knowledge of the language itself. But even if You do not, You may find some articles useful for understanding the Java language and other technologies.

How will it look like? At the beginning we need a workshop and tools. I intend to show You how to install everything from scratch in order to be able to do anything with some frameworks, libraries, etc. In other words: I will start with well-known "Hello World". After that I will add some bricks to build the whole wall: extend existing threads by adding new issues, wrote about the potential problems and so on - towards the complete solution.

Why do all of this on such elementary level? Because sometimes the basics are the worst problem to solve - it is often enough to discourage someone and cause him to give up. Perhaps we loose potential genius... who knows?

My goal is that all examples shown here are possible to execute by Yourself. Their purpose is to serve as a quick-start for something more serious.

That's all. Let the mortal combat begin...