Note: below description uses Eclipse Indigo, Tomcat 7.0.28, MyFaces 1.2.12 and JSTL 1.2.1.
Requirements:
Requirements:
- installed Java (description here)
- installed and configured Eclipse (description here)
- installed and configured Tomcat for the Eclipse (description here)
You will learn:
- how to create "Hello World" application in JSF 1.2 using Eclipse
Note 2: I use standard capabilities of IDE platform to generate the project, without those thousands automated plugins which do everything for the user. Sometimes configuration and usage of a plugin is a "pain in the ..." - in my opinion it is worth to know how to deal with a standard set of tools, and after that there is always a time to faciliate our life ;-)
Many publications and tutorials about JSF (Java Server Faces) very briefly descibe the configuration of development environment for the described examples. Many times I saw such situation: after few sentences about "how amazing is JSF" there was a simple list of JSF tags with their attributes described. Or at the beginning there was an example of "Hello World" application and every line of code was described and explained.
I think that is what is missing is the lack of an example of complete project with its directory structure and an information how to create this project and deploy on the web server. I saw some examples where the project structure was shown, but for the building and deploying application user had to use Ant and type some commands. Great, but we need Ant, when we have Ant, we need to be familiar with it to write build.xml file, then we need something else and so on and so on.
This is of course OK if we want to write everything from scratch by hand. But wouldn't it better just to start our IDE, make some clicks and have a complete and working project ready for further development?
Let's see how it looks like in Eclipse IDE.
Step 1: creating dynamic web project for the Tomcat.
Open menu "File->New->Project" and in the "web" section find and choose "Dynamic Web Project" and press "Next":

Press "Next" to go further and set some basic project's properties:


After that we should have generated project structure for the web application.
Step 2: adding JSF capabilities for the generated project (JSF and JSTL libraries).
The easiest way is to download latest libraries of MyFaces 1.2.x from here and JSTL 1.2.x from here, and copy all .jar files into generated WebContent\WEB-INF\lib directory. After that just refresh the whole project by pressing "F5" on the project's root and all libraries should appear in the section named "Web App Libraries" in the project's structure.
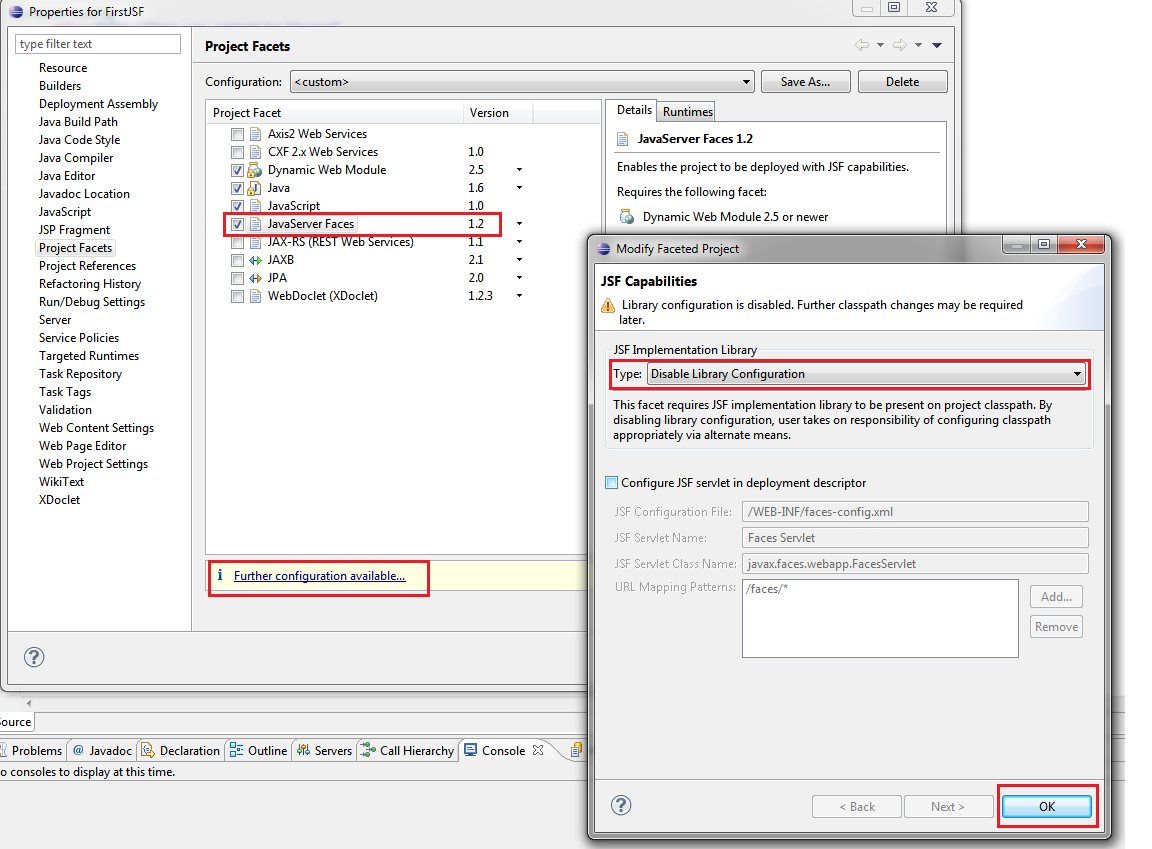
In addition it is worth to enable nice feature named Code Assist. Code Assist allows automatically complete JSF tags when typying by pressing CTRL + Space. It also provides direct access to beans, their methods or fields directly from JSP page - just by click on bean/field name. In order to do this just right click on the project and from the opened context menu choose "Properties" option. Locate the section "Project Facets" and check the option "JavaServer Faces". Then "Further configuration available...". On the screen You have to select "Disable library configuration" and press OK:
Note: project facet "JavaServer Faces" allows to download JSF libraries automatically and add them to the project. Unfortunately JSTL libraries still needs to be downloaded manually.
Step 3: the overview of a project.
When steps 1-2 where done as described, the project structure should look like this:


Step 4: "Hello World" application.
Now we are ready to implement some sample JSF application. First we should create a package named com.firstjsf.backingbeans in the "src" directory. Second we should create two classes inside the package named HelloMessageBean and WelcomeBean. Third we should modify generated faces-config.xml file by adding there our classes and navigation rules. Everything should look like this:


Be careful about small and big letters - names should be exactly as shown above. In the faces-config.xml file we created entries for the navigation rules for not existing yet web pages. Let's create those web pages (index.jsp and message.jsp) in the WebContent directory:


Application is ready.
Step 5: deploying on Tomcat.
At the bottom of a screen locate "Severs" tab. We should have already Tomcat there. Right click on server name to open its context menu, ten choose option "Add and Remove...":

Choose our project and add it to the server by pressing "Add" button:

Step 6: running the application.
Go back to the "Server" tab again and make sure that our project is visible on the server. Then click the marked icon to start the server:

After starting the server we should see that the server state was changed:

After deploying application on the server and starting the server, we have to open a browser and type in URL:
http://localhost:8080/FirstJSF
What next? This simple working project can be used as a base for further learning about JSF. For example we can change the view technology from .jsp to facelets. We can add libraries which extend our standard tags by adding tags with ajax support, i.e RichFaces.
-------------------------------------------
Download source files:
Note: make sure that Java, Eclipse and Tomcat are properly installed and configured for running the project (additional configuration may be required if different directories are used).
4 comments:
Thanks - I was looking for a good, simple example.
Some issues:
- I had to add commons-codec-1.8.jar
- The URL for index.jsp for me seems to include "faces", like this: http://localhost:8181/FirstJSF/faces/index.jsp. Why?
- When I enter a name and press the "Go" button, I don't get a welcome but the URL is extended with a jsessionid.
1) You need not only put the libraries into "WEB-INFO/lib" folder but add them into build path.
2) In web.xml file need to add after
faces/index.jsp
3) In web.xml file need to change in xsi:schemaLocation row 3.1)ending to ".../web-app_2_5.xsd" 3.2)arg version="2.5"
Thank you for this tutorial.
In fact there are almost no explanation about jsf itself, but the technical realisation with tools is very good and simple. The missing explanations can be then only a matter of some search in internet.
There are enough tutorials for this subject out there, but in fact for me tutorials like this are the better than those with pages of explanations and an auto generated project with maven.
Great, thank you very match
Post a Comment