Wednesday, September 21, 2011

Tomcat - using Realm to protect access to JSF application (part 2 of 2)

Note: below description uses Eclipse Indigo, Tomcat 7.0.28, MyFaces 2.1.7
 
Requirements:
  • understanding basics of Tomcat's Realm
You will learn:
  • how to define users and roles in own web applications (JSF 2.0 as example)
  • how to use encrypted passwords for realm users instead od plain text
In the previous post I described how to configure access to Tomcat's server administration application using Tomcat's Realm elements. The whole thing boiled down to write a few lines of text in server.xml file. But how does it look like when we have to do it from scratch in our application?

Step 1. Let's create very simple JSF application which has only 3 pages:
  • /index.html - main page with two buttons navigating into two pages:
  • /unrestrictedPage.xhtml - page always accessible and visible to anyone
  • /restricted/restrictedPage.xhtml - page and directory available only for valid users
The complete application structure will look like:


Step 2: we have to add a privilleged user named admin with password adminpass who belongs to role privillegedUsers (You can choose any user login, password and role name). Just simply add this line:
<user username="admin" password="adminpass" roles="privillegedUsers" />
into [tomcat directory]\conf\tomcat-users.xml file.

Step 3: configuring application. We have to modify web.xml of our sample application by adding following text:
<web-app>
...
    <security-role>
        <description>
              All persons belong to that role have access to restricted application area.
        </description>
        <role-name>privillegedUsers</role-name>
    </security-role>

    <security-constraint>
        <web-resource-collection>
            <web-resource-name>Restricted</web-resource-name>
            <url-pattern>/faces/restricted/*</url-pattern>
            <url-pattern>/restricted/*</url-pattern>
        </web-resource-collection>
        <auth-constraint>
            <role-name>privillegedUsers</role-name>
        </auth-constraint>
    </security-constraint>

    <login-config>
        <auth-method>BASIC</auth-method>
        <realm-name>Restricted access</realm-name>
    </login-config>
...
</web-app>
First we defined a role named privillegedUsers - the same we put in tomcat-users.xml file above. Second we have to defined prottected parts of our application, by providing proper URL pattern. Please note that we have two entries here: /restricted/* - everything in this directory is protected in case someone typed this part manually in browser's address bar,  /faces/restricted/* - JSF adds "faces" prefix when navigating between pages, so the URL is a little bit different and we have to watch for this also. After that we have to define a role which is allowed to access to the protected parts. This is privillegedUsers role defined earlier. At the end we have to define the way how the authentication is done - the simplest way is BASIC, which displays predefined form with credentials.

Now we are ready to deploy our application on Tomcat and run it. It should look like this:
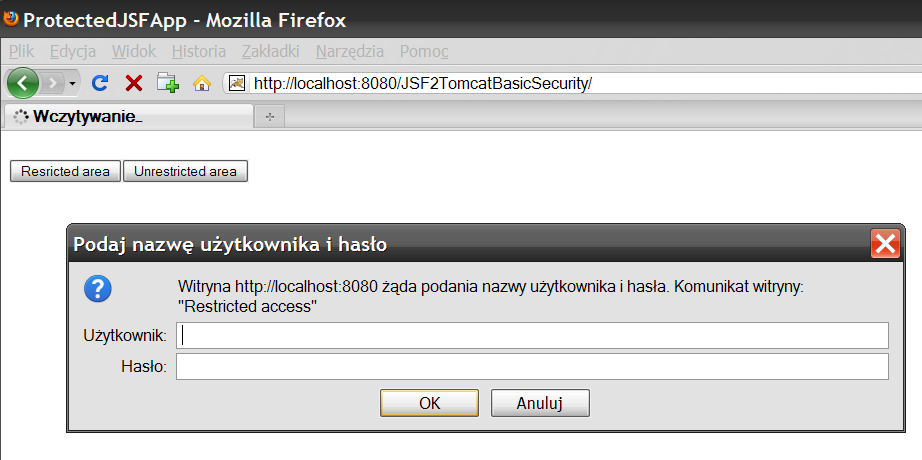

when we try to access to restricted area. In order to do this we have to put credentials for user defined in step 2 (admin, adminpass).

Note: there is a little trick here, for the button "Restricted area" - see index.xhtml page source code:
<h:commandButton value="Resricted area" action="/restricted/restrictedPage.xhtml?faces-redirect=true" />
<h:commandButton value="Unrestricted area" action="/unrestrictedPage.xhtml" />
Because JSF internally by default makes forward to other page, browser is unaware what has happened and display URL from one step back. In such case our URL security patterns will not match anything, and restrictedPage.xhtml will be displayed without asking for login and password! In order to make protection work we have to perform full redirection for that action in order to force browser to fetch target URL and display it. For JSF applications it is better to use filters or Spring Security in order to avoid such dirty tricks.

Encrypted passwords.

As You probably have seen, passwords vor valid users are stored inside tomcat-users.xml file as a plain text. There is a possibility to store them in encrypted form, using MD5. Here is what needs to be done:

Step 1: using Eclipse modify Tomcat server.xml and its <Realm> atrribute into:
<Realm className="org.apache.catalina.realm.UserDatabaseRealm" resourceName="UserDatabase" digest="MD5"/>
Step 2: in web.xml change <auth-method> from BASIC to DIGEST

Step 3: for user admin and his previous password adminpass we have to generate its md5 equivalent using Tomcat's digest.bat file (located in [tomcat directory]\bin folder) :

digest.bat -a md5 admin:"Restricted access":adminpass

"Restricted access" is a realm name taken from <auth-method> tag from web.xml. Those names must match, if name contains spaces, it must be surrounded with "".


Step 4: using Eclipse modify Tomcat's tomcat-users.xml file:
<user username="admin" password="db7bc05adcf611fc779f32a4e680cc01" roles="privillegedUsers" /> 
where password was taken as a result of executing command from step 3.

-------------------------------------------
Download source files:

Note: make sure that Java, Eclipse and Tomcat are properly installed and configured for running the project (additional configuration may be required if different directories are used).

Eclipse complete sample project is here (with all required libraries).

Tuesday, September 13, 2011

Tomcat - change default application, protecting access to web applications using Realm (part 1 of 2)

Note: below description uses Eclipse Indigo, Tomcat 7.0.28,

Requirements:
  • installed Java (description here)
  • installed and configured Eclipse (description here)
  • installed and confiured Tomcat for the Eclipse (description here)
You will learn:
  • how to change default Tomcat application
  • how to allow users access to Tomcat's server administration application using Tomcat's Realm

Let's assume that You have Tomcat which is configured to work in Eclipse. When You start Tomcat (using Eclipse or standard scripts from Tomcat's distribution) and type in the browser URL http://localhost:8080, You will see Tomcat's default application:


This application is located in the [tomcat directory]\webapps\ROOT folder. If You want to change this page, just edit content of file index.jsp and index.html. If You want to completely remove this application, just remove complete ROOT folder.
Removing is not the best choice, because Tomcat is shipped with a special applications for server administration. You can access those applications using links in red square. Try to click on any link - You should see screen with login and password prompt:


Those parts are protected using Tomcat Realm. What is Realm? Realm is a set of valid users (defined by user name and password) and roles where those users belong. The idea is to configure access to web application only for valid users from certain roles. But where are those users and roles stored? It depends on a implementation of a realm - they can be stored in database, in LDAP, or in xml file. Tomcat's server administration application uses xml file to define users' access. Let's try to set up some users able to start that application.

Step 1: using Eclipse open server.xml from the Servers, and make sure that entry <Realm classname="org.apache.catalina.realm.UserDatabaseRealm" resourcename="UserDatabase"></Realm> exsits between <Engine> tags, outside <Host&gt tags - it means that this realm will be used for all hosts and all applications on that  hosts:


Step 2: using Eclipse open tomcat-users.xml from the Servers and add an entry for the user who will be able to access Tomcat's server administration application:


By default UserDatabaseRealm uses [tomcat directory]\conf\tomcat-users.xml file to load users and their roles into memory on server startup. In order to allow defined users to access administration application, they need to belong to roles named manager-status, manager-gui and admin-gui. After changes made, restart Tomcat server and try to access Tomcat's administration application giving username and password from tomcat-users.xml file. If everything was set up OK, You should see mentioned applications.

You may wonder why we used here roles named manager-status or manager-gui or admin-gui. Those role names come from Tomcat's server administration application specific settings, stored in the web.xml file. In the next post I will show how to protect own application (JSF2 application will be used as an example) and how to define own roles.

Thursday, August 04, 2011

Sending emails using Java Mail and Google Mail account

Requirements:
  • installed Java (description here)
  • installed and configured Eclipse (description here)
  • valid Google Mail account
You will learn:
  • how to send e-mails from Java application using Java Mail and Google Mail account.

Sometimes You need to send an email from Your Java application. In order to do this You have to use valid e-mail account, and You have to know the address of SMTP server for this account. And of course You have to write some code which will connect to the SMTP server (using Your account credentials) and then create and send email. A Google Mail account will be used as an example.

Step 1: create clean Java Eclipse Project

Step 2: download  JavaMail API 1.4.4 (javamail_1_4_4.zip) from here.

After downloading JavaMail, extract it and go into its /lib folder. Copy all .jar files from that directory into Your project and add them to the build path.

Step 3: write a simple code for sending email using Google Mail. You can use TLS or SSL connection to Google SMTP server.

a) using TLS connection to SMTP server:
// ...
import java.util.Properties;
import javax.mail.Message;
import javax.mail.Session;
import javax.mail.Transport;
import javax.mail.internet.InternetAddress;
import javax.mail.internet.MimeMessage;
// ...
Properties propsTLS = new Properties();
propsTLS.put("mail.transport.protocol", "smtp");
propsTLS.put("mail.smtp.host", "smtp.gmail.com");
propsTLS.put("mail.smtp.auth", "true");
propsTLS.put("mail.smtp.starttls.enable", "true"); // GMail requires STARTTLS

Session sessionTLS = Session.getInstance(propsTLS);
sessionTLS.setDebug(true);

Message messageTLS = new MimeMessage(sessionTLS);
messageTLS.setFrom(new InternetAddress("random_sender_4568744122@gmail.com", "John Smith"));
messageTLS.setRecipients(Message.RecipientType.TO, InternetAddress.parse("random_recipient_4568744122@gmail.com")); // real recipient
messageTLS.setSubject("Test mail using TLS");
messageTLS.setText("This is test email sent to Your account using TLS.");

Transport transportTLS = sessionTLS.getTransport();
transportTLS.connect("smtp.gmail.com", 587, "random_sender_4568744122@gmail.com", "sender_account_pass"); // account used
transportTLS.sendMessage(messageTLS, messageTLS.getAllRecipients());
transportTLS.close();

b) using SSL connection to SMTP server:
// ...
import java.util.Properties;
import javax.mail.Message;
import javax.mail.Session;
import javax.mail.Transport;
import javax.mail.internet.InternetAddress;
import javax.mail.internet.MimeMessage;
// ...
Properties propsSSL = new Properties();
propsSSL.put("mail.transport.protocol", "smtps");
propsSSL.put("mail.smtps.host", "smtp.gmail.com");
propsSSL.put("mail.smtps.auth", "true");

Session sessionSSL = Session.getInstance(propsSSL);
sessionSSL.setDebug(true);

Message messageSSL = new MimeMessage(sessionSSL);
messageSSL.setFrom(new InternetAddress("random_sender_4568744122@gmail.com", "John Smith"));
messageSSL.setRecipients(Message.RecipientType.TO, InternetAddress.parse("random_recipient_4568744122@gmail.com")); // real recipient
messageSSL.setSubject("Test mail using SSL");
messageSSL.setText("This is test email sent to Your account using SSL.");

Transport transportSSL = sessionSSL.getTransport();
transportSSL.connect("smtp.gmail.com", 465, "random_sender_4568744122@gmail.com", "sender_account_pass"); // account used
transportSSL.sendMessage(messageSSL, messageSSL.getAllRecipients());
transportSSL.close();

Note: in both cases You for the connect() method, You have to pass a real login and password of the Google Mail account used. The main differences between those two methods are: different protocol (smtp for TLS and smtps for SSL), different ports (587 for TLS and 465 for SSL). In addition TLS requires STARTTLS.

-------------------------------------------
Download source files:

Note: make sure that Java and Eclipse are properly installed and configured for running the project (additional configuration may be required if different directories are used).


Eclipse complete sample project is here (with all required libraries).

Wednesday, August 03, 2011

SSL in Tomcat under Eclipse (part 2 - certificate from CA)

Requirements:
  • You should be able to generate self signed SSL certificate and integrate it into Tomcat, as described in previous post.
You will learn:
  • how to obtain and install a real SSL certificate from well known Certificate Authority (CA)
In the previous post I described the complete procedure of generating self signed SSL certificate and integrating it into Tomcat. In this post I would like to focus on the example with real certificate obtained from CA - I will use Thawte as example.

Note: let's assume that You created an application which is going to be visible under the following URL: http://www.myapp.com.

Step 1: generating self signed certificate for domain www.myapp.com.

This is exactly the same step to step 1 in previous post. You have to execute the following command:

keytool -genkey -alias myappcert -keyalg RSA -keystore myapp.keystore

Step 2: Generate Certificate Signing Request (CSR).

You have to generate a special request, which will be send to the CA. You have to execute command:

keytool -certreq -keyalg RSA -alias myappcert -file certreq.csr -keystore myapp.keystore

Generated request is saved as a certreq.csr file, which will be send to CA. CA will use this file to generate certificate signed by them.

Important: You have to use exactly the same alias (in this example: myappcert) for step 1 and step 2.

Step 3: Getting certificate from CA.

Usually certificate are delivered in PKCS#7 or X.509 format. For the first one, the file with certificate will have .p7b extension, for the second one - .cer. Sometimes You can get such certificate also by email as a pure text - for the X.509 format, certificate will be placed between tags -----BEGIN CERTIFICATE----- and -----END CERTIFICATE-----, for PKCS#7 certificate will be placed between tags -----BEGIN PKCS7----- and -----END PKCS7-----. Then You have to copy the certificate content (including those begin/end tags!) and save this as a .cer or .p7b file (You can use Notepad for that). Now You are ready to import Your signed certificate.

Step 4: importing signed certificate.

a) as a .p7b (PKCS#7) format:
Acording to the Thawte, when You obtained Your certificate as a .p7b file, You need only one command to import and install this certificate in Your keystore:

keytool -import -alias myappcert -trustcacerts -file signed_cert.p7b  -keystore myapp.keystore

where signed_cert.p7b is a signed certificate obtained from CA.

b) as a .cer (X.509) format:
According to the Thawte, when You obtained Your certificate as .cer file,  You need to download Primary and Secondary Intermediate CAs and import them. They are delivered as .p7b format (i.e. intermediate.p7b). I should import them first, using command:

keytool -import -trustcacerts -alias intermediatecerts  -file intermediate.p7b -keystore myapp.keystore

and then import my certificate (it is in .cer file signed_cert.cer) using this command:

keytool -import -trustcacerts -alias myappcert -file signed_cert.cer -keystore myapp.keystore

where signed_cert.cer is a signed certificate obtained from CA.

Problem and workaround:
Both above ways seems to be simple, but... when I was buying some time ago a web SSL certificate from Thawte, I receive certificate as a pure text in e-mail. Certificate was in X.509 format (I had tags ----BEGIN/END CERTIFICATE-----). I created a signed_cert.cer file from that e-mail content. Then I tried to install intermediate certificates like it was described in Thawte documentation. Unfortunately it didn't work. The first command for importing intermediate certificates failed with error:

keytool error: java.lang.Exception: Input not an X.509 certificate

It seems that keytool does not work with .p7b format (I used JDK 1.6.0_16), so I expect that even if I get my certificate as .p7b file (complete, without need to import intermediate certificates as in a) subpoint) it will also not work. I took a .p7b file with intermediate certificates, opened it under Windows, and for each certificate found inside i exported it as a X.509 DER certificate, giving each file .cer extension. So I had three .cer (X.509) files: signed_cert.cer, thawte_primary.cer, thawte_secondary.cer. Now I had to import intermediate certificates and after that import my signed certificate with those commands:

keytool -import -trustcacerts -alias primary -file thawte_primary.cer -keystore myapp.keystore
keytool -import -trustcacerts -alias secondary -file thawte_secondary.cer.cer -keystore myapp.keystore
keytool -import -trustcacerts -alias myappcert -file signed_cert.cer -keystore myapp.keystore

Now import was OK. So the general workaround rule (if there are any troubles) is: get all needed certificates in X.509 form, import intermediate certificates (if any required) and import Your signed certificate at the end.

Important: You have to use exactly the same alias (in this example: myappcert) like You used in step 1 and step 2, except for importing intermediate certificates - You can use whatever alias You like.

Step 5: copy Your myapp.keystore file into Tomcat's /conf directory

Step 6: modify Tomcat configuration to use SSL certificate

It is exactly the same as step 3 in previous post.


That's all.

Monday, August 01, 2011

SSL in Tomcat under Eclipse (part 1 - self signed certificate)

Requirements:
  • installed Java (description here)
  • installed and configured Eclipse (description here)
  • installed and configured Tomcat for the Eclipse (description here)
You will learn:
  • how to set up Tomcat for SSL connection using self signed certificate under Eclipse
When You want to secure Your application SSL is the most natural choice. In order to make Your application be recognized as trusted by browser, You can by a buy a certificate from well known certificate authority (CA), which will be generated for the domain Your application uses. If You do not care about being recognized as trusted service, but instead You just want to encrypt the data exchanged between server and client's browser, You can use Your own self signed SSL certificate. In this post I will show how to generate such SSL certificate and how to set up Tomcat (from the Eclipse level) to use generated certificate.

Note: let's assume that You created an application which is going to be visible under the following URL: http://www.myapp.com.

Step 1: generating self signed certificate for domain www.myapp.com.

Go into Your Java bin directory (i.e C:\Development\Java\bin). Then open Windows console (under Windows Vista/7 open the console with Administrator right) and type in command:

keytool -genkey -alias myappcert -keyalg RSA -keystore myapp.keystore

where myappcert is the name of the certificate being generated and myapp.keystore is a file where certificate will be stored. You will be asked about the password for created the myapp.keystore file. Type in "mypass", press Enter and type it again and press Enter again. Then You will be asked for some details about You:


Please note that for the first question about first and last name I gave answer www.myapp.com. This is very important - this name (known as CN - Common Name) will be used for the checking if certificate on the page we visit was generated for the same URL which we typed in in the browser.
At the end You will be asked for the password for the newly created certificate. The password must be the same as one used for myapp.keystore file ("mypass"). Do not type antyhing, just press Enter to use the same password. Your myapp.keystore file containing myappcert certificate is ready.

Step 2: copy Your myapp.keystore file into Tomcat's /conf directory

Step 3:  modify Tomcat configuration to use SSL certificate.

Make sure that Your Tomcat is configured with Eclipse and works OK without SSL (start Tomcat from Eclipse and type in http://localhost:8080 in the browser). Stop Tomcat if it is running. Then open server.xml file form the "Servers" view:


and locate default element for standard HTTP connections (marked red). Then add additional element for the SSL connection (next to existing one):
<Connector
        SSLEnabled="true"
        clientAuth="false"
        keyAlias="myappcert"
        keystoreFile="conf/myapp.keystore"
        keystorePass="mypass"
        maxThreads="200"
        port="8081"
        scheme="https"
        secure="true"
        sslProtocol="TLS"
 /> 

Please note that next to some specific SSL settings, we set the location of the keystore file, the password for that file and certificate name to be use. SSL connection uses port 8081, where normal HTTP connection
uses port 8080.

Note 1: all modification of server.xml file were done from Eclipse level, using "Servers" view. If You want to use Eclipse WTP for starting Tomcat (like I do so far) You can't edit this file from elsewhere. Eclipse WTP overrides original Tomcat configuration files by files visible under "Servers" - changes done outside Eclipse will not be visible for WTP.

Note 2: I added element specific for SSL next to existing element for standard non encrypted HTTPS connections. This is second issue directly connected with Eclipse WTP - when You remove standard connector for HTTP, Eclipse will close Tomcat after a time set in "Timeouts" section in the Tomcat settings:


Some people try to extend the timeout time into long period, but still after this period Eclipse kills Tomcat process, as if Tomcat was not properly started in the required time. Unfortunately there is no way to set timeout into ifinite time - the only way to fix this under WTP is to leave standard HTTP element in Tomcat's server.xml file.

Step 4: that's all. Tomcat is configured to work with SSL. 

Try to enter the URL: https://localhost:8081. If You see Tomcat's page, everything works OK (You can see certificate warning - You Need to add security exception for that certificate). Of course You can still open the same Tomcat page by standard HTTP (You have two elements), just enter http://localhost:8080 URL.

Wednesday, July 27, 2011

Tomcat OutOfMemoryError: Heap space/PermGen space

Note: below description uses Tomcat 7.0.28

Have You ever seen such error in Your logs? Probably yes. It simply means that available memory for Tomcat was consumed and nothing left. To be precise: available memory for JVM which Tomcat uses to run.

What causes this error? It can be caused by memory leaks in the application or the applications has big requirements "by design", even if there are no memory leaks. For the first case You should use some profiling tools to find and fix memory leaks - perhaps this might help without need to change memory settings for Tomcat JVM. If You are sure that Your application has no memory leaks, the only way is to increase memory used by Tomcat JVM. See below how to do that - please note that I described modifying Tomcat memory settings when it is installed as a service under Windows OS.

32-bit Windows
The main problem here is that 32-bit OS is able to see no more than 3,2GB of RAM, even if You have 4GB or more physically installed. This is upper limit of memory that can be use - in theory. However, in practise You will not be able to use more than 1 to 1,5GB of RAM for Tomcat's JVM - the rest of memory is used by OS itself and installed software.

64-bit Windows
Let's assume that You need to assign more than 1,5GB of RAM for Tomcat JVM. Therefore You need 64-bit OS with at least 4GB of RAM (for example 64-bit Windows Professional supports up to 192GB of RAM). Of course You must also use 64-bit JDK - when You use 32-bit JDK under 64-bit OS, You will again face the limit of 3,2GB RAM. You also must use 64-bit version of Tomcat (as it contains Windows service wrapper to use with 64-bit JVMs on 64-bit Windows platforms). Below You will find complete list of all needed steps:

Step 1: make sure You are using 64-bit Windows OS. 

Step 2: install 64-bit JDK and set $JAVA_HOME to the installation directory. 

Step 3: download .zip file with 64-bit Tomcat for Windows (file: apache-tomcat-[version]-windows-x64.zip). 

Step 4: extract Tomcat and go into Tomcat's /bin directory.

Step 5: open service.bat file and locate the line with --JvmMS and --JvmMX parameters, and modify it with new values memory, eg:

%EXECUTABLE%" //US//%SERVICE_NAME% ++JvmOptions "-Djava.io.tmpdir=%CATALINA_BASE%\temp" ++JvmOptions "-XX:MaxPermSize=1024m" --JvmMs 2048 --JvmMx 4096

Note: PermSize is set in different way than heap which has predefined JvmMS and JvmMX flags.

Step 6: open Windows console with administrator rights, then go into Tomcat /bin and execute command:

service.bat install tomcat6

Step 7: start service with command:

net start tomcat6

Note 1: You can skip point 5 and execute directly point 6. After that just start tomcat6w.exe which is a GUI tool for managing the service. You can set memory values there.

Note 2: as an alternative to above steps, You can download Tomcat service installer (file: apache-tomcat-[version].exe) which performs service installation, and then use tomcat6w.exe tool for tune memory settings.

That's all. Your Tomcat service should use provided memory settings.

Sunday, May 22, 2011

PostgreSQL - strange database server errors under Windows

I often use PostgreSQL as a database server for my web applications which are usually deployed under Tomcat. PostgreSQL and Tomcat are registered as system services which starts automatically when Windows starts. 

In one of my application I have about 50 different databases with connection pools for each database, where each pool has about 10 connections opened. So I have about 500 connections opened for requests. Each opened connection is visible as a separate postgres.exe process in the system next to the own PostgreSQL processes also visible as postgres.exe (usually 5 processes). Sometimes under Windows XP Prof. SP 3 I saw PostgreSQL stop working and in the server logs there were errors like:
  •  java.net.SocketException: No buffer space available (maximum connections reached?): recv failed
or:  
  • server process (PID XXXX) was terminated by exception 0xC0000142 HINT:  See C include file "ntstatus.h" for a description of the hexadecimal value.
--------------------------------------------
No buffer space available error:

"Maximum connection reached" may suggest that we set too low value of max_connections in postgresql.conf file. Let's assume that settings for connections amount and required memory are OK for the server, but the problem is still visible from time to time.

The first thing to be checked is amount of short-lived ports (ephemeral). Those ports are used by applications during their normal work. They are opened and live until certain application works, in comparison to server application ports that are typically open for the entire time that the server computer is running. They are assigned automatically from predefined range. Range differs between operating systems:

a) Windows 2000 -> from 1024 to 5000
b) Windows 2003 Server -> from 1024 to 5000
c) Windows XP (all service packs) -> from 1024 to 5000
d) Windows Vista -> from 49152 to 65535
e) Windows 2008 Server -> from 49152 to 65535
f) Windows 7 -> from 49152 to 65535
g) Linux kernels -> from 32768 to 61000 (see /proc/sys/net/ipv4/ip_local_port_range)

If the available pool of ephemeral ports is exahsuted we see Windows WSAENOBUFS error (no buffer space, code 10055). In order to check for exceeded range, we have to see how many processes are running in the system and how many ports they are opening - we can use free TCPView application. We can kill the process that causes exceeding or we can increase the range of ephemeral ports. If we want to increase it, we have to change a registry entry named maxUserPort in:

HKEY_LOCAL_MACHINE\SYSTEM\CurrentControlSet\Services\Tcpip\Parameters\maxUserPort
 
If that registry entry does not exist it means that system uses default value (see above) and we have to create this entry. Then we have to set a proper value for that entry (REG_DWORD) from the range 5000 to 65534. 

The second thing to be checked is limit of half-opened TCP/IP connections (connection with state SYN-RCVD). When this limit is exceeded, TCP/IP starts up SYN flooding attack protection (when SynAttackProtect is enabled). This limit differs between operating systems:

a) Windows 2000 Workstation -> 500
b) Windows 2000 Server -> 100
c) Windows Server 2003 -> 500 
d) Windows XP SP 1 -> 100
e) Windows XP SP 2, SP3 -> 10
f) Windows Vista SP 1 -> 10
g) Windows Vista SP 2 -> limit removed (not implmented = unlimited)
h) Windows Server 2008 SP 1 -> 10
i) Windows Server 2008 SP 2 -> limit removed (not implemented = unlimited)
f) Windows 7 -> limit removed (not implemented = unlimited) 

We can use mentioned TCPView application to check for half-opened TCP connections. This limit can be increased by changing the registry entry named TcpMaxHalfOpen in:

HKEY_LOCAL_MACHINE\SYSTEM\CurrentControlSet\Services\Tcpip\Parameters\TcpMaxHalfOpen

If that registry entry does not exist it means that system uses default value (see above) and we have to create this entry and then manualy assign new value.

Under Windows Vista SP2, Windows 7 or Linux I did not see that error.

--------------------------------------------
0xC0000142 error:

This problem is not so easy to explain, although I was able to fix it. The error code means that "A dynamic link library (DLL) initialization routine failed." I am not sure what exacly causes this... 

In my case under Windows XP Prof. SP 3, when I started my application and number of postgres.exe processes was about 100 (it should be about 500, see description at the top) the whole database server process was suddenly terminated and I saw second mentioned error (with error code 0xC0000142) in the logs. The most important part here is that PostgreSQL service, which spawned many postgres.exe child processes, was registered under LOCAL SYSTEM account, without "Allow Service to Interact with Desktop" option set.

It seems that this problem is not only connected with PostgreSQL. It is general problem with services and their subprocesses (see this and that article). From the information found the problem my be connected with so-called desktop heaps (see more here and here). Some people having similar problems with many subprocesses did the workaround by setting "Allow Service to Interact with Desktop" to true for their LOCAL SYSTEM services. I was able to fix it under Windows XP Prof. SP 3, by registering PostgreSQL service for regular user account instead of LOCAL SYSTEM (see "Long Version" from my article about manual installation of PostgreSQL how to do this). I also checked this under Windows Vista SP2 and Windows 7 - it works OK there, even under LOCAL SYSTEM account. Under Linux I did not see that error.

I did not try to assign more desktop heap from default for Windows XP SharedSection=1024,3072,512 (2nd or 3rd value needs to be changed) and then try it again to run under LOCAL SYSTEM without "Allow Service to Interact with Desktop". Perhaps this might also help.