Showing posts with label Tools. Show all posts

Wednesday, October 08, 2025

Gather all hammers inside toolbox - version 3

Whenever I decide to get back into programming after a longer break, I often find myself wondering how to set up the tools again. What has changed since last time? Does everything still install the same way as it used to?

This is the third post on this topic — the first one was written back in 2009 and can be found here, while the second one came out in 2019 and is available here. Let’s see what has changed since then.

Our goal remains the same — to build applications in Java. And we want to quickly set up all the essential tools we’ll need for that:

  1. Java JDK
  2. IDE
  3. Git
  4. Maven

As before, all things will be installed in C:\Development. 

After installing the tools, we’ll go classic and create a simple "Hello World" project using the installed JDK - with the code safely managed under Git version control.

Installing Java


This is where things have changed the most. We used to have a free JDK from Sun, then from Oracle — all nice and simple — until version 1.8, when commercial licensing entered the picture. Fortunately, free alternatives are still around, such as OpenJDK from Oracle or Amazon Corretto from… Amazon, of course :) And let's use JDK from Amazon.

Step 1: Download zip for Windows 64 from here.
Step 2: Create directory C:\Development\Java\AmazonJDK\Java25_64bit and extract downloaded zip there:


Step 3: After extract create/edit system variable named JAVA_HOME with value C:\Development\Java\AmazonJDK\Java25_64bit then modify Path system variable by adding %JAVA_HOME%\bin at the end.


Step 4: Verify Java installation by opening command line and type java -version and javac -version. You should see informationa about Java installed:


Installing IDE


Step 1: Create directory C:\Development\Jetbrains\Idea

Step 2: Download and install application named JetBrains Toolbox from here. If you have a JetBrains account, sign in to it from within the installed application — this way, if you already own a license for any of the tools, everything will activate automatically without any extra steps.

Step 3: In the Toolbox application, point to the default installation path you created in step 1 for all your development tools.


Step 4: Choose IntelliJ IDEA (Community for free or Ultimate if You have licene) and install it. It will be installed in the path from step 1.

Installing GIT


Step 1: Download Git for Windows from here. 

Step 2: Run the downloaded git installer and choose directory C:\Development\Git as the installation target. Then You can leave all options default, but I changed some of them, i.e I want to use my Notepad++ editor as default (not VIM), I do not want to use credential manager (I want to type password every time)


Step 3: Verify installation and basic configuration.

Open command prompt and execute command git --version to see if git responds. After that configure user and email by typing commands (replace XYZ with Your value):

git config --global user.name "XYZ"
git config --global user.email "XYZ"

Below is an example of running all these commands in action:


Installing Maven


Maven will be used for dependency managment, building and running future apps. Idea comes with bundled Maven, so we do not have install our version. But similar to installing Java, we will install our own version of Maven.

Step 1: Create directory C:\Development\Maven. Then download Maven (binary zip archive) from here and unpack it to the created directory.

Step 2: Create directory C:\Development\Maven\repository for artifacts downloaded by Maven:

Step 3: Tell Maven to use created above directory as a repository. Locate Maven settings file named settings.xml and add a line inside:


Step 4: Add Maven's bin folder to the system PATH variable in order to use maven commands from console.


Step 5: Verify if Maven is installed correctly. Open command line and execute command: mvn --version. You should see similar information:


Hello World in Java using above tools

We’ve got JDK, IDE, Maven, and Git all set up. Now let’s create a sample application that puts all these tools to good use.

Step 1: Open Intellij and create a new Java project. Give it a name HellWorld, make it controlled by Maven, and select our installed JDK:


Step 2: Open generated project and run its main class by clicking green play button as seen on below screen:


In the console, you can see that the project is being compiled and executed using our JDK.

Step 3: Let’s put this project under Git version control. 

First we have to tell where is our Git installed - just open settings, type in Git and chose already installed Git. InteliJ will automatically autodetect the path, just click Test button to display installed version:


Next, we need to add our project to a local Git repository. We do this by running the git init command in the project’s source directory. There are two ways to do it:

  • Open the project folder in Windows Explorer, right-click inside it, and choose "Open Git Bash here" or
  • Run the same command directly from the IntelliJ terminal.

Let’s go with the second option — but first, let’s make sure IntelliJ uses Git Bash as its default terminal instead of the standard Windows one (cmd.exe). Open settings again and find settings for Terminal:


After apply just open the terminal and run git init command there:


That all. Project is fully set up and saved in local Git repository.

Friday, April 08, 2022

Git for Windows - tips

Some time ago I described how to install Git For Windows and how to use it in IntelliJ Idea. See here for details. I realised that from time to time I go back to those things:

  • modifying git config files and trying to find them
  • working with passwords
  • using different editor for commit message

Let's take a closer look.

Modifying git config files and trying to find them.

Git uses three different config files (usually named .gitconfig) at three different levels: 

System


Location: [your_git_for_windows_instalation_path]/etc/.gitconfig or  [your_git_for_windows_instalation_path]/mingw64/etc/.gitconfig.  

Purpose: contains values applied to every user on the system and all their repositories. If we want to read/write from/to this file we have to pass --system option. Because this is a system configuration file, you may need superuser privilege to make changes to it.


Global


Location: [windows_user_directory]/.gitconfig

Purpose: contains values applied to certain (usually logged in) user on the system and all repositories this user works with. If we want to read/write from/to this file we have to pass --global option.


Project


Location: [project_directory]/.gitconfig

Purpose: contains values applied to certain project. If we want to read/write from/to this file we have to pass --local option, or use no option. When changing values in certain project/git repository we have to execute this command being located in that project.

Working with passwords.


During installation process Git For Windows offers to install Git Credential Manager (GCM) - a tool for storing passwords in a secured way. 

But what if want to enter password every time when we push/pull code from remote repository? We can select "None" when Git installer asks for manager. But what if we already installed it and we want to remove it? We have to entirely remove below entry from system config file:  

[credential] 
    helper = manager

Git will start to ask for passord every time, but it will do it using OpenSSH popup window. If we want to disable it in order to enter password directly from command line (or in terminal window in IntellJ), we have to add empty entry for system config file by executing this command: 

git config --system core.askpass ""

If You really want to not to enter password every time during pull/push  with remote repository it is better to use SSH keys.

Using different editor for commit message.


By default Git For Windows offers to install vim as a default editor for commit messages. It is XXI century, we have many great editors under Windows, so do not do this mistake and do not install this archaic editor for linux geeks ;) Why? Let's demonstrate it with example.

1. We have a "Hello World" java application maintained by Git:


2. When we commit changes and in the commit command we pass commit message, we will not find any issues with the vim:


3. But let's use a commit command where no commit message is passed and we expect an editor to open and let us put message there. W use git commit command without "-m" option:


As we see vim is opened in the terminal and after start insertion mode (press Insert) we can type in commit message. Now we have to save the commit message. As You know we have to press Esc in vim to exit insert mode and type something like :wq!. 

Good luck :) When You press Esc focus is switched to the Main.java file instead of terminal where vim is opened. It is a known issue in IntelliJ when using Git in its terminal: https://stackoverflow.com/questions/67848200/how-do-i-commit-a-git-message-in-intellijs-terminal

In short: You have to change Esc key binding to switch focus under IntelliJ (assign different key not only remove Esc). Or if You have luck and do left-click (on some area different than file edit window) with Esc, You may sooner or later exit from insert mode:


After typing :wq! we see that commit is complete with our message:


You can now say: "What a problem, just change this binding if You still want to use git from terminal.  Or just use excellent graphic integration with git from IntelliJ". I would say: "Maybe it is high time use excellent external editor which I use every day instead of archaic one which I have to configure in unusual way".

4. Solution: use external editor instead of vim (here I will use Sublime).

First we define default editor in git system config file using this command:

git config --system core.editor "'C:/Dodatkowe/Sublime/subl.exe' -w"

Now we check if there are any entries about core.editor in global config file and specific project config file (which may override system setting). If  we find any, remove them. Now let's try to use Sublime as editor:


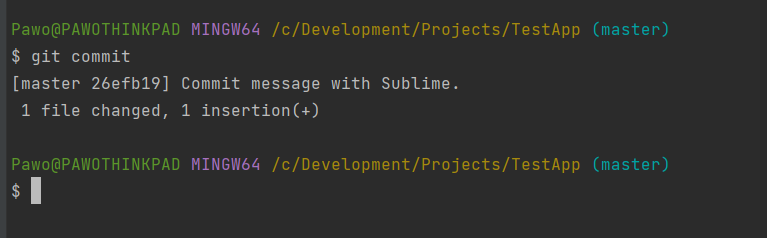
After typing in git commit Sublime editor is opened in new window, where we can type in our commit message. Please notice what IntelliJ displays in terminal: 

hint: Waiting for your editor to close the file...

Yes, it is wating until You save the file and close Sublime (when using vim it is also display this message, but exiting there is harder ;)). So lets save the file by Ctrl+S and close the Sublime:


It works without changing anything in IntelliJ.


Sunday, January 13, 2019

Gather all hammers inside toolbox - version 2

It's been a long time since I wrote something here. When I started this blog, one of the first thing I wrote about was how to set up development environment. It was ten years ago - see here. A lot of things changed in Java world in this time. Let's try to set up everything again using modern and most popular tools now.

What are we going to do?
  1. Install Java JDK - we still have Java like in the past, however significant changes were done by Oracle last time.
  2. Install IntelliJ Idea  - an IDE, as replacement for Eclipse.
  3. Install Git as version control system for our source code.
  4. Write a sample Java "Hello World" application to check if installed IDE and Java works.
  5. Use Git with our "Hello World" application.
  6. Install Apache Maven for dependency management in our projects.
As before, all things will be installed in C:\Development

Installing Java


We all get used to that Java is free to use either for personal or commercial purpose. It was true for Java 8 and older versions until 1st January 2019. Starting from 1st Jan 2019 Oracle announced end of public updates of Java SE 8. It simply means If You use Java in commercial purpose and You want get updates for Your Java SE 8, from 1st January 2019 You have to pay for this.

Why Java 8, what about other versions like 9,10,11...? From Java 8, every three years Oracle will relese Java version known as Long Time Support (LTS). First LTS is Java 8, second is Java 11 - it means that Java 9 and 10 is no longer supported now. Changing licensing model for commercial use means that You have to pay for the updates/support for each LTS version starting from 8 (from 1st Jan 2019). See more here.

So what are options? We can:
1. Stay with latest available Java 8 from Oracle (JDK 8u192) without possibility to update anything - we don't have security updates, but we are free of charge.
2. Become Java Commerical User and pay for latest JDK (11 at the time of writing)
3. Use OpenJDK from Oracle - this is free Java for commercial use, but each new version is publicly available in 6-month interval, with 6-month support/updates available. So every half a year You have to update used OpenJDK on Your own.
4. Use a Java based on OpenJDK but with long-term support - for example Amazon Corretto 11 available here.

Let's use JDK 8 from Oracle from point 1. If You want to use latest free Java with LTS You can use Amazon Corretto from point 4 - just download .zip file and extract it for exmple into C:\Development\Java\AmazonJDK\Java11_64bit

Step 1: Download 64 bit version of JDK 8u192 or Windows from here.
Step 2: Create directory C:\Development\Java\OracleJDK\Java8_64bit and start the installer:


Remove installing public JRE and choose previously created directory:


Step 3: After succesfull install create system variable named JAVA_HOME with value C:\Development\Java\OracleJDK\Java8_64bit then modify Path system variable by adding %JAVA_HOME%\bin at the end.

Step 4: Verify Java installation by opening command line and type java -version and javac -version. You should see informationa about Java installed:


Java is installed.

Installing IntelliJ Idea


Step 1: Create directory C:\Development\Jetbrains\Idea
Step 2: Download and install an application JetBrains Toolbox from here. This is an application to maintain all products from Jetbrains (IntelliJ Idea manufacturer). It allows to automatically update installed tools.


Step 3: Configure toolbox.

Choose created directory in step 1. Do not forget to  click apply after choosing it. If You have any license from Jetbrains, log in into your account now - You will not have to provide license when installing tools:


Now You can choose a tool to install:


After click on a tool, it will be installed into the previously selected directory:


Just click on tool to launch it. You can also change settings of the tool being installed, like update plan, memory consumption and so on:


IntelliJ Idea is installed. Start it, then go thru some creator in order to perform basic settings (You may leave all the options default).

Installing Git


Git will be used to track changes we make in our projects files. 

Step 1: Download Git for Windows from here. 
Step 2: Create directory C:\Development\Git. Run the downloaded git installer and choose created directory as the installation target: 


Install Git using all defaults (including vim as default editor), but allow git to be used from command line:


Step 3: Verify installation and basic configuration. 

Open command prompt and execute command git -version to see if git responds. After that configure user and email by typing commands (replace XYZ with Your value):
 
git config --global user.name "XYZ"
git config --global user.email "XYZ"

Below screen shows all those commands and their results:


Step 4: Make IntelliJ aware of installed Git.

Open settings and type Git in search box. Go to Git settings and set path to git.exe:


That's all. Git is installed and configured in IntelliJ Idea.

"Hello World" - sample java application


Step 1: Create directory C:\Development\Projects

Step 2: Run Idea. You will see initial screen for creating/opening/downloading a project. Choose create new project:


Step 2: Choose Java project type:


Idea is shipped with its own JDK. We would like to use our own JDK. Press button New ans select the JDK directory C:\Development\Java\OracleJDK\Java8_64bit (or another directory like C:\Development\Java\AmazonJDK\Java11_64bit if You use Amazon Corretto). Then press Next.

Step 3: Choose project type from template: 

 
 Step 4: Choose project name and location (use projects directory created in step 1): 


Step 5: Sample application is ready. You can start is using green "play" button:


Step 6 (optional): Leave only our installed JDK for future projects. 

As mentioned above, Idea comes with built in JDK. We can disable showing this JDK as a option to select for future projects and leave only those we installed in C:\Development\Java\OracleJDK\Java8_64bit. In order to do it open project properties and find Platform SDK. Then choose JDK provided by Idea and delete it:


Then select our installed Java and change its name:


From now this is only one and thus default Java to use in Java projects. Of course You can add other JDK version like OpenJDK.

That's all. Idea is configured and ready for Java development.

"Hello World" - sample java application with Git


Using git is beyond of the scope of this blog :) There are many great tutorials explaining the nature of git - for example this one. I will show how to add a git support to the existing project (Hello World created earlier).

Step 1: Convert existing projest into git respository. 

Open project location (C:\Development\Projects\Test) and using context menu (right mouse click) select option Git Bash Here. Git will open its terminal with path set to the project. Now enter command git init:


This will create empty repository:


The project is now maintained by Git.

Step 2: Verify git integration under IntelliJ Idea. 

Open Test project in Idea to see that it is recognized as a git project now:


Step 3 (optional): Use git command directly from IntelliJ Idea.

Idea has great integration with Git, however it is possible to use git commands entered by hand directly in Idea - just like we use them in Git Bash. We can use Idea's terminal and set it to open Git Bash under the hood. Go to the settings and find options for Termimal. Set shell path to point to the Git Bash executable script with some additional options:


Now we can execute git command in Idea's terminal:


Installing Maven


Maven will be used for dependency managment, building and running future apps. Idea comes with bundled Maven, so we do not have install our version. But similar to installing Java, we will install our own version of Maven.

Step 1: Create directory C:\Development\Maven. Then download Maven (binary zip archive) from here and unpack it to the created directory.

Step 2: Create directory C:\Development\Maven\repository for artifacts downloaded by Maven:


Step 3: Tell Maven to use created above directory as a repository. 

Locate Maven settings file named settings.xml and add a line inside:


Step 4: Add Maven's bin folder to the system PATH variable in order to use maven commands from console.

Step 5: Verify if Maven is installed correctly. 

Open command line and execute command: mvn -version. You should see similar information:


Note 1: Maven displays information about Java used. That's why You have to install Java before and set JAVA_HOME variable.

Note 2: There is no need to set up MAVEN_HOME or M2_HOME system variable like it was done for previous versins of Maven.

Now we can tell IntelliJ Idea to use installed Maven instead of bundled. Open settings, type Maven in search field. Idea will show settings for Maven. Choose Maven installation directory. We may notice that Idea will display recognized version of selected Maven installation and local respoitory path will change to the value set in step 3:


Please note that this setting is not global - it is only for currently opened project. If we want to use our manually installed Maven in other projects, we have to repeat above step in those projects.